How to Implement a Preventive Maintenance Program

A preventive maintenance program is key to ensuring all equipment is operating at full capacity. Your equipment’s manufacturer outlines specific tasks in order to maintain their individual piece of equipment. The hard part to this is actually completing the required maintenance on time.

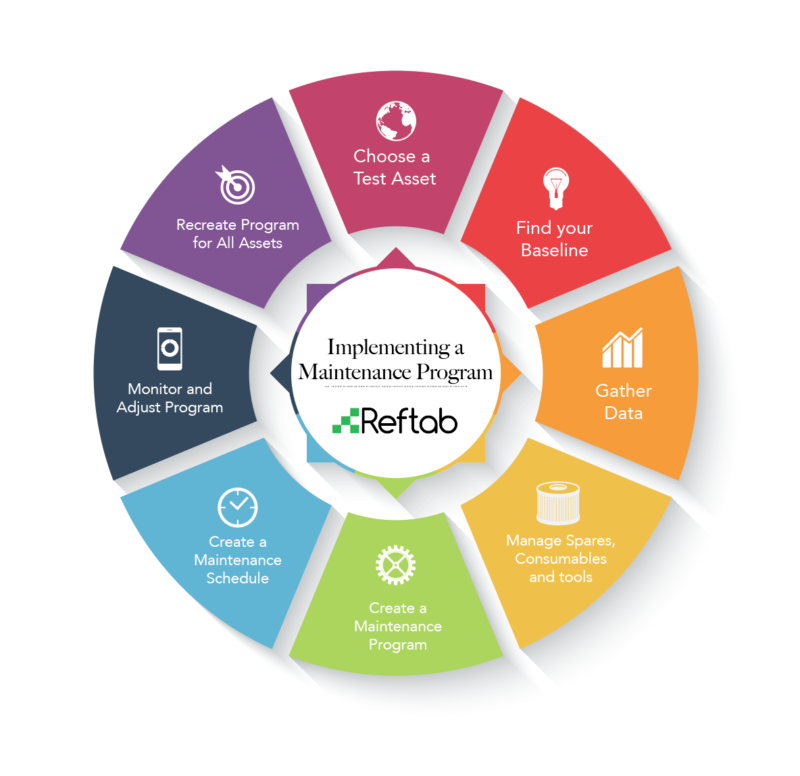
You may have a dedicated spreadsheet dedicated to maintenance, a clipboard attached to the asset or even a program to help with this maintenance. All of these are completely acceptable ways to achieve the same result. No matter how you look to implement your program we have outlined an 8 step process to achieve this.

  1. Choose a Test Asset
  2. Create a Baseline
  3. Gather Data
  4. Manage Spares, Consumables and Tools
  5. Implement a Maintenance Management Program
  6. Maintenance Schedules
  7. Monitor and Adjust Program
  8. Recreate this Program for All Assets

Step 1 – Choose a Test Asset

In our experience, creating a maintenance program for one asset is much safer than trying to reinvent the wheel for your entire floor at one time. There will be bumps in the road as this process does take time to get exactly right. However, if you can perfect a program with one asset, you will very easily be able to duplicate this process ten, twenty even one hundred times over.

In order to find the right test asset, we recommend choosing one that will cost the least amount of money when down. Your first maintenance program may have unnecessary downtime while trying to find the right process. Any machine that isn’t running is time and money lost, so its best to choose an asset that can be down without crippling your workforce.

Step 2 – Create a Baseline

Once you have chosen the Test Asset you need a good baseline for where things have started. This can be anything from current performance to the current maintenance processes. If you don’t have a starting point there is no way to know which direction you are heading. A recommendation is how much unexpected downtime a particular machine has head in the past.

Step 3 – Gather Data

Each machine will have a specific maintenance schedule provided from the manufacturer. This could be anything from the amount of running hours to a set schedule. You will need to do the proper research on your Test Asset to ensure you are completing maintenance exactly as intended. Most manufacturers will void warranty if maintenance has been completed improperly.

Another great place to start is to ask; What were the reasons for downtime on this machine and what could be done to prevent the downtime? You may need to include extra tasks in your maintenance plan after finding out ways to prevent downtime.

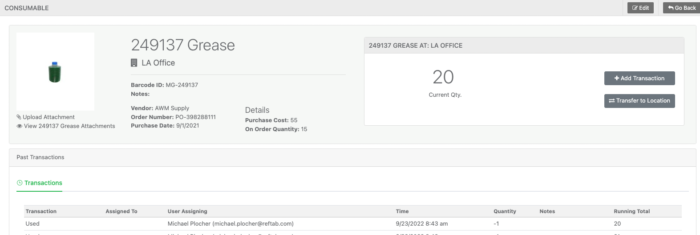
Step 4 – Manage Spares, Consumables and Tools

This step is extremely important in knowing that you have exactly what is needed to complete the desired maintenance. Now that you know the tasks needed, ask yourself what equipment is needed to complete these tasks. Whether it is specific fluid (consumable), a specific spare, or even a tool that is needed. You need a place to track these items and a clear plan on when and how to use them. You should also have a plan on when and how to obtain more of these items when the time is right.

manage consumables with Reftab

Step 5 – Implement your Maintenance Management Program

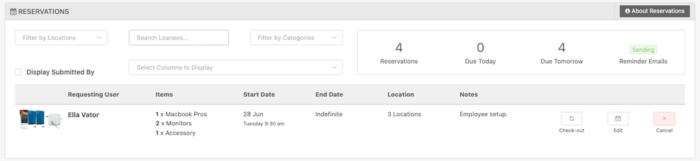
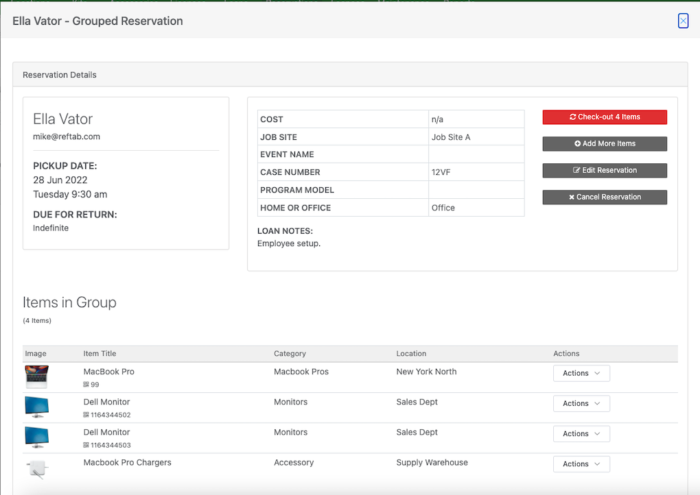
Step 5 is to decide the specific process you are going take. By choosing proper maintenance software you can be alerted when its time to order replacement consumables or even when your next preventative maintenance is due.

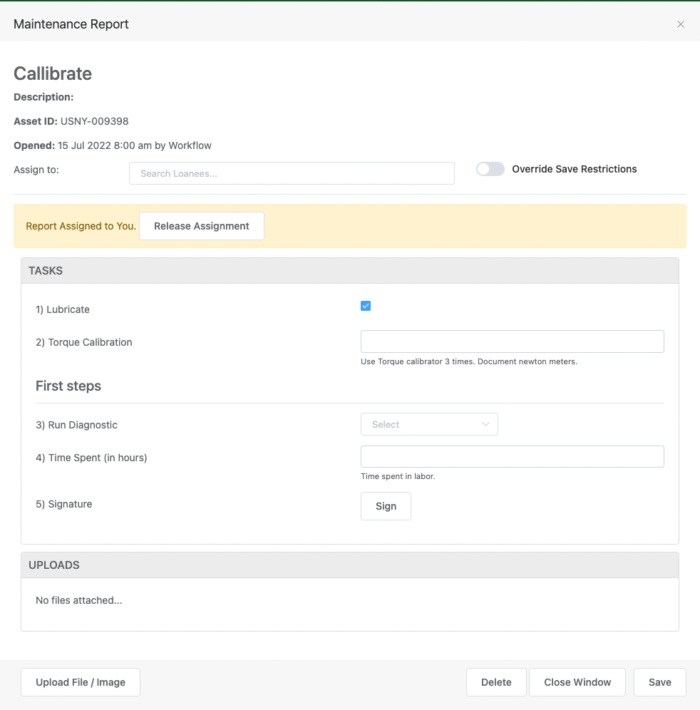
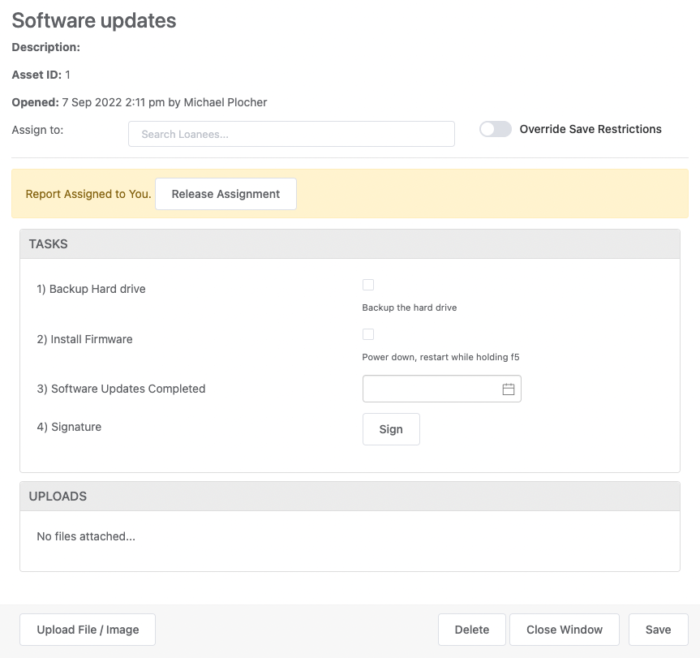
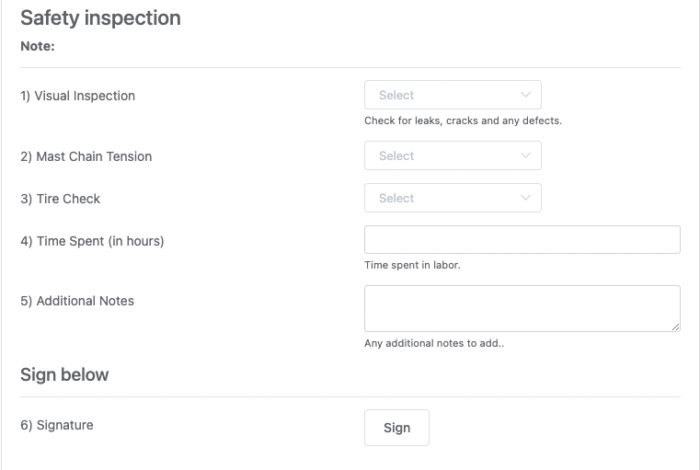
You should come up with the proper processes at this point. How should your technicians handle maintenance and what do you expect from them? You should have clear and defined processes for each task in order to improve accountability. 

maintenance checklist in Reftab

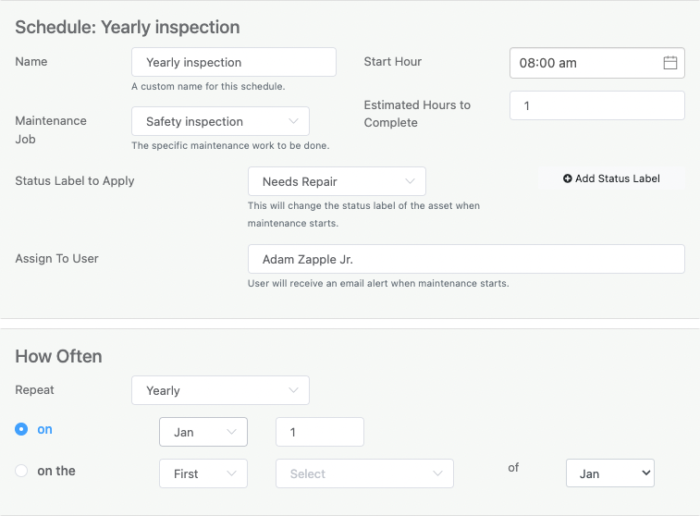
Step 6 – Maintenance Schedules

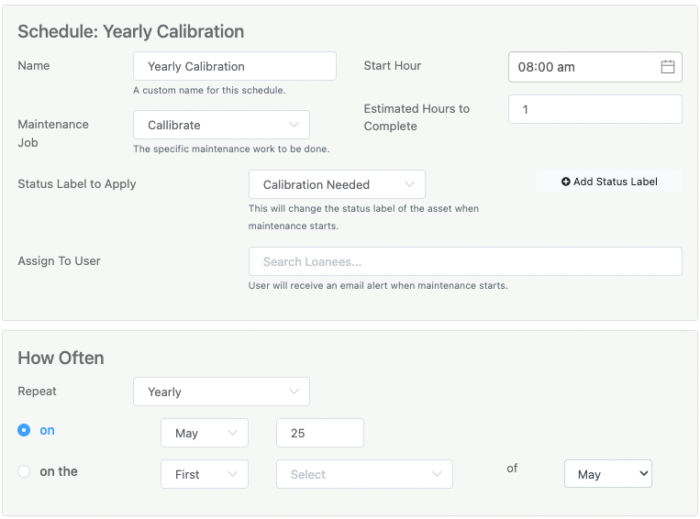
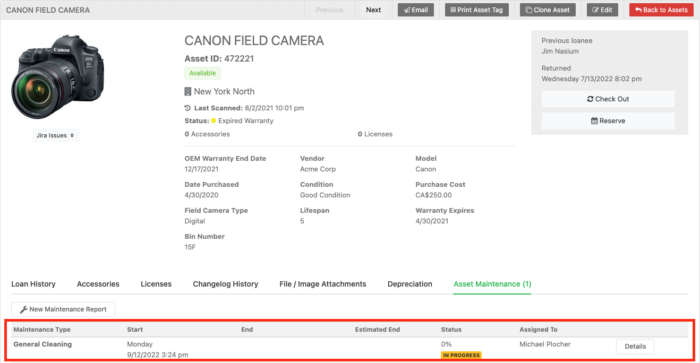
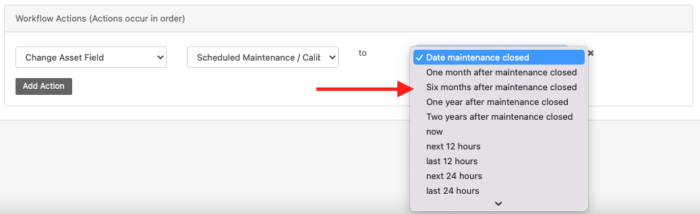
Now that your employees have clearly defined tasks in mind. We need to decide how often your maintenance should be performed. If using a maintenance management program you may be able to implement predictive maintenance based upon run time, mileage, etc. Your manufacturer will also have timelines within the specifications for each equipment. Find the tasks that should be done weekly, monthly or yearly and create the proper schedule for those.

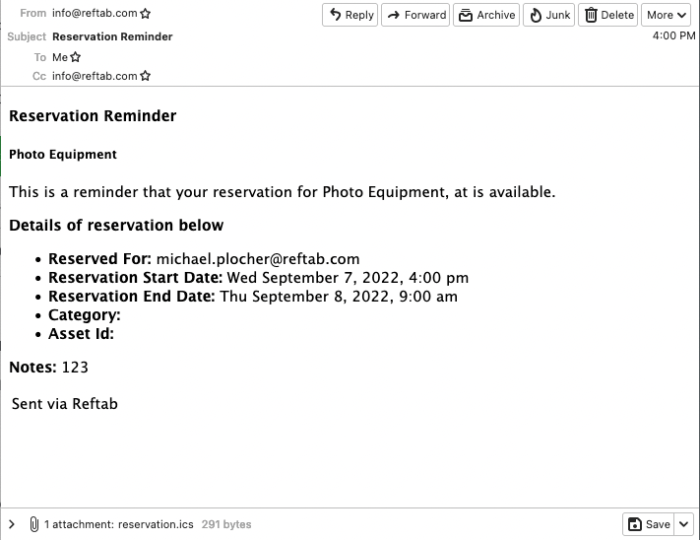
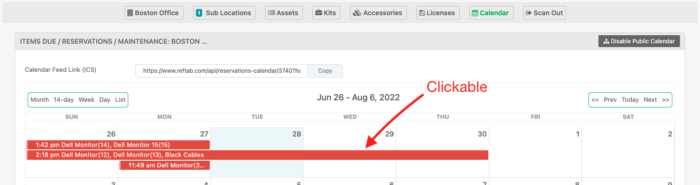
You also need to decide how you want to stay on top of this schedule, whether you are writing it in a calendar or you want to be notified will depend on the route chosen in the previous step. The easiest way would be to have your managers notified of the maintenance. You can also choose to have them go and check the calendar themselves, this could lead to issues but it is completely up to you and the way you run your business.

maintenance schedule in Reftab

Step 7 – Monitor and Adjust Program

As mentioned in step 1, there will be bumps in the road. The process we have come up with may not be the perfect way to complete maintenance. We’re perfectionists at Reftab and believe in always adjusting your program to keep up with changes in the business. Gather your data from step 2 and run those same tests. Ask yourself the same questions to find out exactly how well the maintenance program is working. This is a good time to ask the technicians how the process is working.

The idea behind this step is to perfect maintenance on our test asset. You may need to head back to Step 6 and adjust your schedule. Or even, step 5 and completely readjust the program you implemented. Either way you choose to go this is much easier done on one asset, rather than the entire floor.

maintenance report in Reftab
Reftab’s Chart Builder helps visualize the results of each report.

Step 8 – Recreate this Program for Each Asset

Once your Test Asset maintenance is running exactly as desired, and you believe you have reached perfection. Its time to recreate these steps on each and every asset on the floor. We recommend taking it slow still, you may run into a few bumps depending on the separate manufacturers of each asset.

Now that you have a good idea on how to implement a perfect program it will be much easier to duplicate this process. We know what went wrong the first time and we can avoid those same mistakes. You may run into more mistakes but that is exactly why we recommend taking this process slow and steady. The payoff in the longterm is much greater if you take your time and ensure this process is perfect.

Conclusion

Implementing a Maintenance Schedule is absolutely daunting at first glance. But if you follow these 8 steps listed, you should have a smooth transition into a successful maintenance program. If you need any assistance here, feel free to schedule a demo with us. We will be here every step of the way and can ensure the processes you’re coming up with will fit the needs of your business.

A Production Equipment Checklist for Creative Agencies and Production Shops

Running a creative agency or production shop? You’ll need more than a vision and great ideas to power your creative work. 

You’ll need the right equipment and know-how to streamline the process of producing film, photo, and commercial shoots for clients. 

In this post, we’re rounding up a bunch of actionable strategies and tips to streamline this process of keeping track of all of your assets. 

Production studio asset management

Keeping track of all of your agency gear 

As your agency or production shop takes off, you’ll find the list of gear you need will grow. You may decide to specialize or expand certain areas of your business, but the list of core equipment you’ll need will look something like this:

  • 4K cameras: A versatile, quality 4K camera is an essential piece of equipment that’s worth the investment early on. 
  • DSLR cameras: Digital single-lens reflex (DSLR) cameras are an excellent option for both video and photography. They allow you to swap out different lenses with the same camera body to switch up the look and feel of your creative output.
  • Drones: From the perfect bird’s eye view shot to capturing clear footage from far ahead, drones are becoming an increasingly common piece of equipment for agencies. 
  • Microphones: A good microphone—be it a shotgun mic, boom mic, or wireless mic— can make or break the audio quality of your film. Without it, you risk poor audio that detracts from the visuals of the piece. 
  • Lighting: Good lighting can enhance the quality of a piece and help your creative outputs appear more professional. Lighting kits are a good choice for most production companies, especially for indoor shoots. These kits give you complete control of lighting at any angle. 
  • Rigs: Two primary types of rigs that can be used in your agency. One is an overhead camera rig and the other is a shoulder rig. You may also have some gimbals and gorilla pods on hand.
  • Tripods: The importance of a good tripod cannot be overstated. Tripods instantly improve the quality and professionalism of any shoot by stabilizing the camera. 
  • External Hard Drives & Memory cards: You don’t want to run out of room on your camera during a shoot and not be able to get the right shot for your client.  That’s why you likely have loads of external hard drives and memory cards on hand. 
  • Batteries: Just as you should always have a backup memory card on you, you should always keep spare batteries on hand. 
  • Editing software: The right editing software is instrumental for any production team. Post-production editing is where your creative vision is truly brought to life. However, you’ll need to keep track of all of the software licenses your agency has. 

For every piece of equipment, you need to keep track of all of the related accessories and licenses as well as where you bought it, how much it costs, serial numbers, warranty information, who is responsible for keeping track of the asset, etc. 

How to streamline equipment management processes

If you are still trying to keep track of all your equipment through spreadsheets, you are wasting a ton of time. Here are some tips to help you streamline the whole process. 

Reserving equipment 

In our experience, a common problem encountered by many agencies is that different employees and freelancers in the company need to search and reserve equipment for specific times for their projects.

Managing this process through spreadsheets creates a lot of headaches:

  • Not a great search experience: Ever try to load and search a spreadsheet that’s actively being used by dozens of people with 10,000+ rows of data in it? It can be frustrating to find what you are looking for.
  • Poor UX when making updates: The poor search experience compounds whenever you need to make an update or change in the spreadsheet, like when you are adding a check-out time for an upcoming client shoot.
  • Lack of accountability: When a bunch of people have the ability to edit a spreadsheet, it is easy for rows to go missing. That means you might not know where all of your equipment is. 
     

With asset management software such as Reftab, you can create a user request portal which gives you a lot more control over who has what equipment, when they reserve it, and when they check it back in.

You can even set up different user access rights within the portal. This way, you can make sure certain equipment is only used by employees in a specific location or for a specific client.  

Communication 

An added advantage of setting up your own custom request portal is you can send automatic email reminders to ensure equipment is returned promptly. This also ensures that you always know which equipment you have at any given time.

Pro Tip: For busy directors on on-site client shoots, you may want to send text reminders too by syncing Reftab with Zapier.  

Maintenance

Sometimes the gear will have an issue or need maintenance. So having the warranty information readily available in your asset management software along with a maintenance log, including notes about what was repaired, is essential. This allows you to keep track of all of the equipment that is currently in the shop and unavailable to be checked out. 

Streamline your agency’s equipment management with Reftab 

When you are investing tens of thousands of dollars into assets to run your agency, you owe it to yourself to make sure you are keeping track of where everything is at any given time.

That’s where asset management software comes in handy. You can not only have a real-time log of your equipment for tax and insurance purposes, but it can also streamline the process of reserving gear Ready to give Reftab a try? Sign up for a free account here.

What is Preventative Maintenance Software?

You may be struggling to keep machines and equipment in working order so that they are accurate and safe for your employees to use. With many different types of equipment with  differing calibration schedules or safety inspections, it quickly becomes a full time job to manage it all. You can alleviate this by implementing preventative maintenance software.

Preventative maintenance software gives you one place to track your past, present and future work orders. Depending on the software you may be able to schedule both predictive maintenance and preventive maintenance. This takes the stress off of you and your technicians and allows the software to handle scheduling for you. In the post, we are going to cover:

  1. Reasons to schedule asset maintenance
  2. What are The Benefits of Using Software to Schedule Asset Maintenance?
  3. How do you Know When Preventive Maintenance Software is Needed?

1. Reasons to Schedule Asset Maintenance

One of the keys to high productivity is ensuring your machines are running at peak performance, 100% of the time. Properly maintaining your machines directly results in higher productivity. Your machines will constantly be running at their peak and proper maintenance means extended longevity of these machines. Most manufactures offer warranties with the main caveat being that proper maintenance is performed. 

preventative maintenance calibration

Another benefit to proper maintenance is the overall safety of these machines. Routine maintenance puts you in control of your assets situation. When routing maintenance is forgotten at some point that machine will reach its breaking point, which will lead to an unexpected and uncontrolled situation. This is where injuries come from. 

2. Benefits of Using Software to Schedule Asset Maintenance

It’s entirely possible to track all of this maintenance on a spreadsheet, however, you will need extensive knowledge in order to create a proper schedule. When using spreadsheets for asset maintenance, your work orders, your schedule and your notes are generally held in three separate places. Proper maintenance software puts all of this information in one place. You and your technicians should have easy access to all asset maintenance. This means at any point in time, your technicians should be able to refer back to past maintenance orders. This can help ensure firstly that all tasks were done but what exactly were the results of each test. Rather than keeping a clipboard attached to the asset, this can easily be completed on a smart device. Lastly, asset maintenance software helps improve accountability within your organization. Maintenance orders can automatically be assigned to your technicians. Once they have completed this maintenance, their manager can be notified and even reminded if maintenance has yet to be completed. 

3. How do you know when Preventative Maintenance Software is needed?

As mentioned above, it’s entirely possible to complete this with a spreadsheet. However, once that spreadsheet is out of control it may be too late. Being in the asset management industry, we have had the chance to speak with numerous clients on this exact topic. They told us, spreadsheets were great in the beginning. After a few months they realized these same spreadsheets just weren’t cutting it. Our clients were feeling overwhelmed and almost completely unable to keep up. They began searching for a fix to this problem and found Reftab to be the answer. Reftab is able to consolidate all of your assets, their maintenance (past, present and future) and the employees these are assigned to in one place. If you have multiple assets in need of maintenance there is no better time than now. The best course is to create an action plan before there is a problem. When you get into the specs of any machine, there is a defined lifespan. Being able to track this lifespan along with all maintenance performed can greatly increase both safety and performance in your workplace.

Conclusion

You can see how important proper maintenance on your machines is. Implementing a proper maintenance procedure could seem like a daunting task but we’re here with you every step of the way. We recommend scheduling a demo with us. We will talk about your exact maintenance needs and help you implement proper plans and procedures to complete this maintenance.

A production equipment checklist for film and media students

Helping students as they embark into media and film can be a rewarding experience for professors and teachers.

However, keeping all of the gear organized, ensuring students only check out gear based on their needs/classes, and streamlining all of your equipment rental processes can be time-consuming and stressful. 

In this post, we’re sharing some actionable strategies to help you manage all of your equipment as well as streamline your processes. 

Keeping track of all the gear that media and film students actually need

From video cameras and microphones to rigs, lighting kits, and editing software licenses, there is a lot of moving parts when it comes to the equipment that students need to be familiar with: 

  • Video Cameras: The types of cameras you have on hand will vary based on your needs and budget. For example, you won’t need the same type of camera for a documentary as you would need for an action film or a TV commercial. 
  • DSLR Cameras: Digital single-lens reflex (DSLR) cameras are a popular choice for film and media students. They’re versatile and allow you to swap out different lenses on the same camera body. 
  • Camera Lens: These can be expensive and also easy to lose out in the field. So, you want to make sure you have a system for tracking them.
  • Shotgun microphones: This type of microphone picks up on distant sounds. They’re typically paired with a boom pole for best results.
  • On-camera microphones: This microphone attaches to your video camera to enhance your audio. They’re best paired with a handheld camera.
  • Wireless microphones: This type of mic helps record audio while talking with your actors or subjects, like in an interview. They attach to your clothes and can often be hidden from view.
  • Lighting Kits: Having lighting kits are the way to go, especially if you plan on shooting inside. They can be used to adjust the lighting on set at any angle. 
  • Camera Lights: A camera light that students can attach directly to a video camera for instant lighting. This is helpful for news and documentary-style film.
  • Light reflectors: A light reflector is a low-budget option to alter lighting. They can help students balance and change the appearance of colors in your scene.
  • Rigs: There are two primary types of rigs: a shoulder rig and an overhead camera rig. The shoulder rig is ideal for following your actors around. The overhead rig is made to set up and shoot from high angles.
  • Tripods: Tripods are an essential piece of equipment for any student. Tripods stabilize your camera for smooth panning and tilting. 
  • Memory Cards: You are going to need lots of high-quality SD memory cards along with external hard drives. 
  • Batteries: You not only need to have enough batteries on hand for all of the camera gear, but you should also have a process for keeping it charged.  
  • Editing Software Licenses: If students aren’t in charge of buying their own software licenses, you’ll need a way to keep track of all of these purchases. 

It is not hard to see how you might have hundreds, if not thousands, of pieces of equipment and accessories that need to be tracked. For each item, you should record the following information in real-time in a master equipment spreadsheet or ideally in your asset management software, like Reftab.  

  • Company / Vendor:  Where did you buy the item? 
  • Cost: How much did you pay for it? This is particularly important for tracking asset depreciation. 
  • Serial Number: This is particularly important for any product warranties. 
  • Warranty Expiration Date: Most product warranties expire after a certain number of months and years. You’ll want to keep track of that. 
  • Location: Where is the asset being stored? 
  • Custody of the Asset: Who is currently responsible for the asset? And do they currently have it in their possession or is it being loaned to someone else? 
  • Asset Maintenance Schedules: This is the maintenance log for each item. 
  • Accessories & Licenses: If the asset has any related accessories or licenses, you should be tracking and attaching those items to this main asset.  

How to streamline equipment reservations for students using Reftab

There are a lot of challenges when it comes to renting equipment to your students from presenting it to students based upon the course they are taking and the equipment they actually need to a self-service portal for handling equipment reservations, preventing double bookings, and managing communications. 

That’s where a solution like Reftab comes in handy. 

How to handle reservations

One of the best ways to save time and your own sanity is to create a user request portal where students can reserve the equipment they need at the specific time they need it. 

Within Reftab, you can even create different role-based access controls, so you can have different user permissions for individual classes. For instance, students in film-making 101 only have the ability to view and check out beginner-level equipment reserved for that class.  This not only prevents overbooking, but ensures students of all levels have the ability to check out the equipment they need whenever they need it.  

Communications and reminders

Many high school and college students are still learning how to manage their time and projects. So, sending out automatic reminders when the equipment is ready to be picked out along with when it is due back is essential. 

If you have a user request portal setup, you can configure automatic equipment reservation confirmation and reminder emails. For instance, a student will get an email and a text when their equipment is ready to pick up as well as several reminders when it is due back (i.e. 24 hours and 1 hour before).  You can also automatically send overdue reminders if equipment hasn’t been checked back in yet.  

Maintenance

When renting equipment, you always hope that everything will run smoothly and last a long time. However, when it is being checked in and out often by students who may or may not know what they are doing, things are going to break. You are going to need a system to schedule and log maintenance work as well as keep track of broken equipment that can’t be checked out. 

For instance, in Reftab, you can schedule maintenance work, log maintenance status, see the full maintenance history (including maintenance dates), create work orders, and set up automated workflows to assign specific maintenance tasks.

When it comes to managing all of your film and media equipment, there are a lot of moving parts. Trying to keep track of everything in a spreadsheet just isn’t efficient. Ready to give Reftab a try? Sign up for a free account here.

How to keep track of Rental Equipment

What do universities, production shops, megachurches, and large nonprofits have in common? They all have a lot of expensive equipment that is checked in and out on a regular basis.

If you are still managing this process through spreadsheets, then there is a good chance your inventory list is out of date and tasks are falling through the cracks.

In this post, we’re sharing a better way to keep track of all your equipment rentals.  

Let’s dive in.

Building a system to keep track of rental equipment 

Every business has three kinds of equipment: fixed assets, bulk equipment, and consumables. All three should be tracked and monitored on a regular basis for accountability and tax purposes.

  • Fixed Assets: These are physical items that are directly needed for your company’s operations. It can include everything from the building you operate in, the cost of the land, and specific machinery you use to furniture, employee laptops, IT software, video and audio equipment, and vehicles.
  • Bulk Stock Inventory: These are assets that are typically used in larger quantities and don’t need to be tracked individually like fixed assets. Instead, you’ll just get a notification when you are running low. Some examples include chains,  rubber brands, and paper clips.
  • Consumables:  These are all of your assets that are used once and then need to be replaced or thrown out. Some examples are printer ink, coffee pods, and screws.

Pro Tip: Reftab has a dedicated feature specifically for tracking consumables.

How to track your equipment? 

Now that you know what assets to track in your business, here are the key things you should keep track of for each item.

  • Company / Vendor:  Where did you buy the item? 
  • Cost: How much did you pay for it? This is particularly important for tracking asset depreciation. 
  • Serial Number: This is particularly important for any product warranties. 
  • Warranty Expiration Date: Most product warranties expire after a certain number of months and years. You’ll want to keep track of that. 
  • Location: Where is the asset being stored? 
  • Custody of the Asset: Who is currently responsible for the asset? And do they currently have it in their possession or is it being loaned to someone else? 
  • Asset Maintenance Schedules: This is the maintenance log for each item. 
  • Accessories & Licenses: If the asset has any related accessories or licenses, you should be tracking and attaching those items to this main asset. 

Use asset management software to manage all of your equipment 

Now if you are a small business with a limited amount of equipment that is rarely checked in and out, you can get by tracking this with spreadsheets.

However, if you have thousands of assets and many of them are being checked in and out regularly by students, interns, or employees, you should use asset management software.

If you use asset management software that will grow with your company, it will also save you boatloads of time and headaches. 

That’s because asset management automates a lot of tedious, manual processes. For instance, you can set up asset tagging, which assigns a barcode, QR code or RFID tracking on all of your physical assets. So, you scan an item and automatically see important information like vendor, warranty details, who last checked it out, etc. 

With thousands of physical assets, you’ll also want the ability to bulk print asset labels. In Reftab, you can even customize category and field configurations

You’ll also want to be able to have an asset log that is always up-to-date (hard to do if you are relying on spreadsheets). This is particularly useful at tax time since you can quickly verify which assets you own, what you bought it for, asset depreciation rates, etc.

You can also run regular reports that allow you to see everything from location of assets to stock levels, which assets are out of commission, and check-in and check-out rates.

Some other key asset management features to look for are a mobile app, user request portal (We’ll cover more on that later in this post), and role-based access controls

Make it easy to check-in and check-out equipment

If you have employees, students, or volunteers that need to check out specific equipment, like video cameras, microphones, or lighting gear, setting up a user request portal where they can reserve items themselves can be a big time-saver for your IT team.

Within Reftab, you can customize the look and feel to be on brand, set up SAML single sign-on, and create different role-based access controls. So, you can gate which equipment specific groups or individuals have access to. This also prevents overbooking and ensures you have historical records on who has checked in and out each item. 

Send reminders and alerts 

Another advantage to having a user request portal is that you can streamline email and text communication including equipment reservation confirmations and reminder alerts for when items need to be checked back in as well as overdue equipment reminders.  

For instance, if an employee at your creative agency requests a 4k camera for an upcoming commercial shoot in the user request portal, it would automatically send them a reservation confirmation email including a calendar invite for when they can pick up the item.

Reduce equipment wear and tear 

The more your equipment is being used, especially if it is being checked in and out a lot by amateurs or students, the more important it is to have dedicated preventive maintenance processes to address wear and tear. Regular maintenance will allow you to keep your equipment in working order longer.When you only have a few pieces of equipment, a spreadsheet or recurring calendar reminders works great. However, once you have more equipment, you are going to want a more solid process that addresses preventative maintenance management, safety inspections, and creates work orders for when things break. Fortunately, most asset management software, like Reftab, has this functionality. For instance, in Reftab, you can schedule maintenance work, log maintenance status, see the full maintenance history (including maintenance dates), create work orders, and set up automated workflows to assign specific maintenance tasks.

When it comes to keeping track of all of your equipment, there are a lot of moving parts. That’s where asset management software comes in handy since you can better keep track of all of your equipment, build out automated check-in and check-out processes and streamline maintenance and repairs. Ready to give Reftab a try? Sign up for a free account here.

Reftab June 2022 Release Notes

Release notes image

Reftab is excited to bring to you these latest release notes. We’ve not issued release notes in a few months, so this will include some of the major updates since February.

As always, we’d like to extend our thanks to those who have submitted feature requests and provided us detailed use cases. We’re proud to be able to develop new enhancements and features to support our customers.

Loan Groups (June 2022) 

Items checked out & reserved together are bundled together for easier management. This update makes the platform more visually conducive to bulk reservations and loans and generally improves overall management and ease of the platform.

For example, when multiple items are reserved in bulk, they will appear under one row on the reservation table. In the sample image below, we can see that these 4 items were reserved together for the same person. As an administrator, it’s easy to view that these items belong together in one reservation.

A reservation group shows items reserved for the same person at the same time and is easily editable.

When clicking “Edit”, you’re now able to edit the items within the group. You can add / edit details, add more items to the group, cancel specific items or check-out the entire group at once.

A detail view of the reservation group

Additionally, you can search and filter based upon field values for loan groups. For example, if you checked out a group of items and logged it under a specific job code or an event name, you can use the search bar on the loans and reservations table to find all the items matching that field value. This is a major time saver because now you can find items grouped together easier, make edits easier and check items in / out much faster.

Prior to this update, if multiple items were reserved (or loaned) to someone it was:

  • a manual process to edit each item, and
  • not visually clear that these items belong together and were part of the same reservation.

Furthermore, the calendar loan events are now clickable. You can see the included items, make edits, return the items, etc..

Calendar events are clickable and will display the loan group.

Reservation and loan groups are made automatically when:

  • Items are checked out or reserved from the bulk pages using the checkboxes on the asset table
  • Items are checked out on the scan page when ‘multiple loan’ is selected
  • Items are checked out or reserved from the cart in the user request portal 

This new update makes bulk reservation and loans easier to manage. This particular update was requested by a lot of users and we’re happy to be able to bring this to the Reftab platform.

(Regarding the mobile app, we are making updates in the coming weeks to align with groups better. As of now the mobile app continues to work as before.)

Custom Emails (June 2022) 

You can now create your own custom emails. From “Settings” > “Email Settings / Logs” click the button, “New Custom Email”.

Create as many emails as you require for workflows. For example, if you wanted to be alerted when a new asset was added or an item was returned, you can create an email with custom text and trigger it to send on certain actions so that you’re kept up-to-date when you need to be.

New Barcode / QR-Code Designer For Custom Asset Tags (Feb 2022) 

Reftab now gives you the ability to create your own labels including the size of the label, customizing your own text and adding images. Label designs are saved in your account which you can use at anytime. One of the biggest advantages this brings, is being able to print asset tags to dedicated label printers such as Zebra, Dymo or Brother printers.

Prior to this update, Reftab only printed to pre-defined Avery sheets. Now, you can take advantage of any existing label printers your school or company may already have, (or even purchase a new label printer) and print directly to your printer with custom branding and more. This is a major update,  we see a lot of people are using it already and received some great feedback.

Click here for a guide: https://www.reftab.com/faq/print-asset-tags/

New Security Features and Updates

  • Domain Verification for SAML setup
    • This prevents unauthorized takeover of SAML domains.
  • Force two-factor authentication
    • This setting can be set by administrators. Click “Settings” > “General” > “Require user to use two-factor authentication”.
  • When using SSO there is a new setting to restrict password login.
    • This setting can be set by administrators. Click “Settings” > “SAML SSO Settings” > “Edit Configuration” next to your domain. > “Allow Password Login”  > “Force SSO Login Only”
  • Access logs are now available to administrators. Click “Settings” > “Security” > “Show login log”. 
    • This will show you the email address, dates, IP address and session information of users logging into your Reftab account.

New General Settings

  • Force user to manually input asset id’s instead of having Reftab auto-generate. 
    • Administrators can enable this setting. Click “Settings” > “General” > “Asset Increment” > “Off”.

Updates to Workflows

  • Workflows have a new action of  “Change Asset Title” (not currently available to all triggers)
  • Workflows now have reflexive options for changing field data.
    • This is a convenient workflow action that helps situations that require dates adjusted on assets after maintenance for example.
New workflow actions for changing asset field values.

New Additions to Custom Access Roles

  • A new setting to allow someone to see maintenance on assets that are hidden. When editing an access role, under the tab “Access Restrictions” there is a new setting, “All Asset Maintenance Visible” – If “On” users will be able to access maintenance reports on the maintenance page for assets that are otherwise hidden to them.
  • A new setting to allow indefinite loans or not. When editing an access role, under the tab “Loan Rights” there is a new setting, “Allow Indefinite Loan”. This is especially helpful for users with portal access. Prior to this update, there was no option for indefinite reservations and loans for portal users.

JAMF Updates

  • If there is a location defined in the “User and Location” tab in Jamf, and you have a matching location in Reftab, assets will be synced to that location instead of the “Default Location” selected in Jamf settings.

Updates to Reftab’s  Google Data Studio Integration

Updates to Maintenance

  • Ability to delete maintenance records. This action is available to administrators and editors only.

Thank you very much to all our amazing customers and partners who use Reftab every day. We will continue to develop Reftab with your needs at the forefront so please reach out to us for any questions and feature requests, we’re always happy to help.

Log into Reftab: https://www.reftab.com/login

P.S. To enter a support ticket or feature request, please email “help@reftab.com“.

How To Print Asset Labels

Barcode Printer

Asset tags lets you manage your physical equipment and devices by affixing a unique serial number, QR code, and/or barcode. These QR code or barcode labels allow precise monitoring and tracking of assets.

Establishing a clear system for both asset tagging and printing labels allows you to get the most out of your assets. However, if you are still doing this process manually, it can be incredibly time-consuming.

In this post, we’re going to share how to print asset labels in bulk. 

What should be included on an asset label or barcode?

How do you print asset labels

Step 1. Determine the asset’s category

Step 2. Establish a unique identification number

Step 3. Select the type of asset label needed

Step 4. Enter the information on the asset label or tag

Step 5. Affix the asset label on the item

3 of the best printers for printing asset labels

1. DYMO

2. Brother

3. Zebra

Automate asset label printing with Reftab

What should be included on an asset label or barcode?

The information on an asset label or barcode will vary depending on what type of equipment you’re tagging, how assets are used, and security concerns.

Your IT department can often help identify the types of equipment that need labeling. For instance, your company may want to focus on labeling equipment that is:

  • At increased risk of theft or being misplaced 
  • A potential security risk if lost
  • Used between multiple departments
  • Portable or expensive, like laptops
  • Expensive and not easily replaced

Knowing the items you’ll be labeling and why helps you determine what information to include on the asset label or barcode.

All labels will include a unique serial number or asset identification number that you create using your labeling system. 

For instance, you can set up a labeling system that includes the location, item, and department code within the item’s ID number. If your employees travel with equipment, assigning different codes to different locations makes it easy to know where a piece of equipment belongs.  

To aid with the recovery of an item, you could put the manufacturer’s name and contact information on the tags instead of your company’s name. This step can help you track the lost or stolen equipment back to the manufacturer without revealing your business’s name.

For equipment that requires regular maintenance or high upkeep, consider including the year items were purchased on the label. This makes it easier to follow a maintenance schedule or identify items nearing the end of their life cycle.

How do you print asset labels 

Now that you know which items you need to label, why, and set up a labeling system, making the asset labels will be straightforward.

Step 1. Determine the asset’s category

The category options will be determined by how you set up your labeling system. For instance, you may categorize based on department (e.g., IT, finance) or how it’s used (e.g., furniture, mobile equipment).

Step 2. Establish a unique identification number

Each asset you label will require a unique identification number so you can accurately track it. This also helps you manage your assets, including ensuring proper maintenance is performed and knowing when to reorder more. 

The information you include depends on the labeling system you set up. 

Step 3. Select the type of asset label needed

There are different types of labels and tags. When choosing the kind of label, consider how durable it needs to be, if it will need to withstand being outdoors, and the level of security required. 

Step 4. Enter the information on the asset label or tag

You’ll want to enter the assets into your system as soon as possible. The data you’ll need to enter will depend on the equipment you’re tracking and your labeling system.

Then you can print the labels.

Step 5. Affix the asset label on the item

How the label is attached can vary based on the type of label you’re using. For example, some tags require a mechanical attachment process, while others use a pressure-sensitive adhesive.  

Asset tag barcode
Labels should be clear with enough whitespace around the barcode for scanning

3 of the best printers for printing asset labels

Some asset management software requires that you use a specific laser printer to print asset labels. That’s not the case if you use Reftab. Our asset label printing features are printer and platform-agnostic. So, you can use any of the three label printing printers below or even a standard desktop printer to print everything from standardized bar code labels to permanent adhesive labels designed for extreme durability. 

1. DYMO

DYMO label printers use direct thermal print technology, so information doesn’t smear or fade. The printers can print barcodes and text. DYMO offers handheld, desktop, and wireless printer options, and all options are PC and Mac compatible. 

They work using the DYMO labels, which offer more than 40 different sizes and color combinations to accommodate different color coding systems and sizes of assets. Additionally, the label material is durable and resistant to heat, UV, and water.

2. Brother

Brother’s asset labeling printers, such as the Brother PT-P900 Series Label Printer provide high-quality printing, support multiple label dimensions, as well as printing durable laminated labels with strong adhesive. The printers can print linear and two-dimensional barcodes and include images and graphics.

You can also print labels of different sizes. This allows you to protect all types of assets.

Brother also has wireless asset labeling printer options so that you can print from almost anywhere with a connection. 

3. Zebra

Zebra offers a wide range of asset label printers and tag types to fit your needs, including barcode and RFID printers. There are printer options for desktops, mobile, small offices, and industrial. The RFID printer provides accurately printed and encoded RAIN RFID labels, tags, and cards.

All Zebra printers are designed to work at high speeds and are durable. Their Print DNA software is designed to make it easy to use, can be managed remotely, integrates prints into your existing systems, and includes security tools to help protect against cyber attacks. Additionally, the software can securely integrate into cloud-based apps and connect to your network. 

The printers work with various Zebra labels, so you can find the right combination for your needs. Zebra offers a wide range of sizes, shapes, and up to 12 water-based colors and 8 UV colors. 

Automate asset label printing with Reftab 

One of the best parts of using asset management software like Reftab is that it is printer-agnostic. It can work with any printer to directly print asset labels—be it either via Avery Sheets or more durable thermal printer labels. This way, you can avoid having to purchase labels from a third party vendor.

With our drag-and-drop label designer, you can create different label sizes as well as put your own logo, additional designs, the barcode or QR code, and any additional information about your company. 

Pro Tip: Want to learn more about how you can print asset labels in bulk? Check out our detailed Knowledgebase article. 

In addition, Reftab automatically generates a PDF of all of your asset labels. So, you can click print and choose your connected label printer or desktop printer. 
Ready to give Reftab a try? Sign up for a free account here.

An Overview of Cloud Asset Management

Blog post image

We live in a world where “it’s in the cloud” has become a common way of describing where a business stores its digital assets. 

Admittedly, the evolution of asset management has accelerated quite a bit over the past decade. What started as simple pen and paper ledgers or spreadsheets are now cloud-based asset management software

Cloud asset management software offers organizations robust capabilities, from asset tagging and mobile apps, to advanced reporting capabilities

In this post, we’re taking a deeper look at what cloud asset management is, including: 

What is an asset cloud?

An asset cloud is a centralized digital storage facility that operates over the internet. The vast majority of businesses today use either cloud software or cloud services for keeping track of company equipment (i.e. fixed assets).

Though asset records can be stored on internal company hard drives and servers, cloud-based asset storage solutions utilize a remote server. This way, a company’s asset records are accessible remotely via the internet, rather than strictly in-office or within specified geographical constraints. Asset clouds ultimately help avoid costly internal infrastructure, enhance company-wide functionality, and provide detailed asset history. 

In the era of remote work, an asset cloud can also enhance employee productivity. With digital assets available from anywhere in the world with an internet connection, an employee can simply log into any business applications they need to do their job. While this may seem like a security concern, many cloud solutions offer robust security features that grant administrators full access control and management. 

What is cloud asset management?

A company’s ability to simply tap into an asset cloud to retrieve its various digital assets is a wonderful thing. However, as with any physical or digital asset storage solution, proper management efforts must be maintained to ensure strong security and continuous functionality. This is where cloud asset management (CAM) comes into play. 

Cloud asset management is the process used to control an organization’s cloud infrastructure and the application data within the cloud. Many organizations use a variety of cloud-based applications to store and manage their digital assets. With a collection of cloud-based asset sources, CAM helps organize assets to avoid operational hiccups and security concerns. 

Incorporating the use of cloud asset management practices provides an organization with visibility and easy control over the digital assets within the company cloud. Optimizing an organization’s asset cloud allows users to efficiently access company data when necessary and provides a method to effectively monitor internal assets and maintain data security.  

Why is asset management important?

From physical products to digital company data, asset management is a critical component of any organization. For one, asset management is necessary for complete visibility and control over various assets. Fully comprehending the who, what, and where’s of an asset inventory helps streamline operations and allows multiple users to access data whenever and wherever.

Not to mention, it’s easy to mishandle company assets without proper management, allowing data to fall into the wrong hands or become swept under the rug. Assets that fall into the wrong hands, especially digital ones, can also cause costly customer debacles and security concerns that can significantly impact overall operations — or invite cybercriminals to your virtual front door. 

Without a proper understanding of where current assets are located, how they’re used, or modification history, an organization runs the risk of unnecessary spending in the pursuit of lost or outdated assets. The ability to monitor assets for inactivity or depreciation can help eliminate unnecessary ongoing costs, as well as schedule replacements or upgrades to ensure ongoing productivity. 

When to DIY vs. use cloud asset management software?

To fully reap the benefits of cloud asset management, you’ll need a solution that’s best suited for your organization’s specific needs. You can choose to either DIY your asset management with spreadsheets or opt for cloud asset management software. Which option you choose will largely rely on your needs and the size of your organization.

Let’s take a look at the pros and cons of each to determine which is best for you. 

Pros and cons of DIY methods

The simplest solution is to use a spreadsheet(s) through Microsoft Excel or Google Sheets.  Bear in mind, these programs are better suited for one sole manager, as the interfaces have not been developed for a multi-user management approach. 

Some of the pros for using DIY solutions include:

  • Price Point: Options like Microsoft Excel or Google Sheets are much cheaper alternatives than robust cloud asset management software
  • Less Data: DIY methods fit smaller organizations that don’t possess an extensive list of assets
  • Physical Assets: Spreadsheets are ideal for physical assets rather than cloud-based assets that have many attachments
  • Flexible Organization: Enhanced organization from modifiable categories and tag identifiers allows for adjustable organization

However, DIY solutions are not always the answer to your asset management, as they have quite a few cons:

  • Individual Use: Spreadsheets offer limited user accessibility and traceability, as they are typically meant for a sole user
  • No Mobile Scanning and Asset Tagging Integration: It is very costly and time consuming to develop a mobile app to scan barcodes and qr-codes that link to your company assets.
  • Time-Consuming Efforts: A lack of automation means that ongoing manual input can become incredibly time-consuming, especially for bulk data
  • High Risk of Error: Non-stop manual input increases the chances of data recording errors and oversight of details such as depreciation 
  • Limited Resources: The inability to attach asset data such as photos, maintenance records, and SOPs means your will lack key details 

Pros and cons of cloud asset management software

If the features of manual DIY asset management solutions just don’t cut it for your organization, you’ll be relieved to learn that there are several cloud-based asset management software options on the market. 

Cloud asset management software is often better suited for larger organizations that simply possess a higher quantity and wider variety of both physical and digital assets. 

Unlike DIY methods, software improves the visibility into each digital asset and its data. This way, your company can keep a finger on the pulse of depreciation, application updates, warranty expirations, and more. Software also comes equipped with strong security features, like dedicated servers and encrypted data, to keep company (and consumer) data safe and out of the wrong hands. 

  • Centralized Data: Cloud-based software centralizes all data in one location to search and organize 
  • Advanced Accessibility: Cloud-based solutions allow for multiple users and remote access
  • Attachment Functionality: Software increases asset efficiency by allowing users to attach vital asset information such as pictures, SOPs, user manuals, and more
  • Less Time and Effort: Software automation helps reduce typically time-consuming management processes while maintaining data accuracy.
  • Mobile Apps: Mobile apps are handy to scan barcodes and qr-codes that display on asset tags.

And while cloud-based asset management solutions can truly pack punch, here are a few cons to remain mindful of:

  • Price Point: Cloud asset management solutions can become pricey depending on your company needs
  • Internet Reliance: Cloud access requires an internet connection, meaning assets may not be available if internet connection is lost 
  • Heightened Processes: Despite automation abilities, companies must be in control of how they establish processes like tagging inventory for assets to be discoverable
  • Learning Curve: It can be a challenge to reach complete software efficiency without the appropriate training and education

Is cloud-based asset management right for you?

Figuring out which asset managing solution is right for your company can be quite the task. If you’re an organization with few digital assets and limited physical inventory, a DIY method may suffice. For developed organizations looking for a highly accessible solution with in-depth management capabilities, cloud-based asset management software may be your answer.

Try a free cloud based, asset management platform like Reftab here: https://www.reftab.com/sign-up

Reftab January 2022 Release Notes

Release notes image

Hello, it’s been a little over a month since the new year. 2021 had been quite an amazing year of growth for Reftab and we are excited to continue improving the platform into 2022. We’re including some highlights from late 2021 here as well.

Business Plan Updates

Installable Windows agent now available.

  • Downloadable from the, “Settings” > “Agent” page. You’ll see instructions on screen for installation.
  • After the agent is installed on a Windows computer, it will add a new asset into Reftab and maintain a connection to your Reftab account. You can sync data such as: “Hostname”, “Free Storage Space”, “Geo Location” , “Serial Number”, and more.
  • The agent is ideal if your organization doesn’t use a management system such as MS Intune because it reduces repetitive and manual tasks such as adding assets into Reftab by hand.

Intune and Jamf Auto Assign Assets to Users

  • Assets synced from Intune and Jamf can now automatically assign assets to users.
  • By having Intune and Jamf automatically assign assets, you no longer need to manually perform repetitive tasks such as checking out assets to users after the asset is added to Reftab.
  • With this update, Reftab is well suited as a “single pane of glass” to manage all  Apple and Windows devices, both networked and non-networked devices along with their current users in one, easy-to-use system.
  • There’s also a setting to map the asset title to a chosen field from Intune and Jamf.

Maintenance Reporting and Assigning Improved

  • You can now build reports on ‘Upcoming Maintenance’.Being able to see the maintenance that is due for an upcoming time period helps manage equipment usage and ensures people who need to be aware of maintenance are kept informed easily.
  • Display Results in Email Body: Scheduled Reports can now display results in the body of the email instead of sent as an attachment. To enable this, edit your scheduled report and check the box,  “Email Results in HTML Table?”
    • When the report arrives in your inbox, you’ll see results on screen  instead of needing to open an attachment.
  • Assign Maintenance to Loanee: Maintenance alerts can be assigned to the “loanee”, meaning whoever is assigned to the item when maintenance is due will receive the alert.
    • Prior to this update, scheduled maintenance only allowed for choosing a specific user to be alerted. Now, you can choose “Loanee” .
    • This is particularly helpful if you have equipment  assigned to users that need to drop-off the equipment to someone else for maintenance. 
    • To enable this, edit your preventative maintenance jobs  and select ‘Loanee’ for ‘Assigned To User”.

Pro Plan Updates

Automated Workflow Enhancements:

  • When building workflows, you can now update asset details automatically.
    • Example 1: when maintenance work is complete, update the asset field of “Date of last complete maintenance” to the date the maintenance completed.
    • Example 2: When maintenance work is complete, update the asset field of “Date of next maintenance”  to one year ahead.
  • New action of “Fulfill Reservation” 
    • This action can automatically fulfill a valid reservation based upon triggers and conditions in the workflow. This is helpful to reduce manual work for users.
    • Example 1: When maintenance is completed on an asset, if the asset has a valid reservation, the workflow will automatically fulfill the reservation at that time.
    • Example 2: Every day at 3:00pm fulfill any valid reservations that have been set on Studio Rooms. 

Updates to Consumables

  • Pick and choose which default transactions to display
    • From the accessory page, click “Custom Transactions” and choose which ones you’d like to keep or remove.
  • New transaction type of “Set Stock”
    • Set stock is a transaction you select when you want to reset the current quantity of a consumable. For example, if you need to do stock take to record how much you currently have, create and use a transaction type of, “set”.

All Plan Updates

  • New setting to default to “Indefinite” loan.
    • Click “Settings” > “Loan Options” > “Default value for indefinite on loans”.
  • Categories and Locations can now have a default image.
    • For categories, click “Asset Categories” > Select a Category > “Set Image”
    • For locations, edit a category and click “Set Image”
    • As of now, these images only display within the mobile app and user portal.
  • Check out emails can now be disabled when loaning items indefinitely. With this setting enabled, check out email only sends for short-term loans.
    • Click “Settings” > “Loan Options” > “Send Indefinite Check Out Emails”
  • Asset details can now appear on the loan emails.
    • Click “Settings” > “Email Settings / Logs” > edit “Loan Checked Out”. You will see a button for “Show Replacement Fields”. Copy and paste any values available into the body of the email.
  • New setting to select a location to move an asset to when checking out and checking in.
    • Click “Settings” > “Loan Options” > “Loan Location Changeable on Return / Loan Location Changeable on Checkout”
    • This is a helpful setting if when assets are checked in / out, you need to move the item to a new location. (Otherwise, you can automate this task with a custom workflow).
  • You can now re-arrange the column ordering on the assets page.
    • Click and drag on column headers to move left and right.
  • You can now  transfer accessories between locations without having to set the accessory as “global”.
    • Prior to this update, only global accessories could be transferred. Now, if you have an accessory created at a specific location, you can transfer it to another location without having to save it to “global” first.
  • New Access Role setting for “Kit Access”. This is a setting that works for all kits as opposed to singular kits. At this time, kits are still governed by the location they are in. If a user logs in and cannot access a location, the kits within that location wont be visible either. This new setting governs access to kits on a global level.
  • Dates are now appended to the automated reports file name. This is helpful because filenames with dates give you an idea of when the report was run.

Performance Enhancements

  • Our team has been working hard to not only keep systems up-to-date on the back end up but to improve performance across the board. Recent updates have been made so that for some users, speed improvements should be noticeable. 

Upcoming Feature Highlight

  • New label designer and print tool
    • We have had a lot of users express interest in being able to directly print barcodes and qr-codes to their dedicated label printers. There are quite a few brands and models of printers, such as Brother, Zebra and Dymo to name a few.
    • This new tool will generate a PDF sized for whichever dedicated label printer, roll size, or desktop printer you use. 
    • You will be able to create and save custom sizes, add images, move the barcode / qr-code and add text.

Thank you for taking the time to read our release notes. As always, these features and improvements are directly from you, our customers. We enjoy building them and working with you to improve, automate and streamline your operations – keep the suggestions coming!


P.S. To enter a support ticket or feature request, please email “help@reftab.com“.

The 5 different approaches to asset management solutions

5 Different Approaches To Asset Management Solutions

From spreadsheets and pen and paper to hybrid solutions and custom asset management software, there are many ways that IT teams can manage both software and physical assets. 

Asset management solutions help you not only track your business assets, monitor asset efficiency, control costs, but also make it easy to manage software licenses (and renewal process) and provide deeper insights and reporting capabilities. 

In this post, we’ll discuss 5 of the best asset management solutions available for businesses of all sizes. We’ll share how they work, the pros and cons of each, and the average cost for the solution.

Analog Approach 

Most businesses start out with an informal approach to asset management. When it is just you and maybe one or two employees, it is fine to keep track of your limited assets in a notebook or whiteboard.

Tracking inventory by hand gives you the freedom and flexibility to build your systems and organize your notes the way that works best for you. You can also take notes quickly without the need to input tedious data into a spreadsheet or app. Another plus is that there’s little to no learning curve with an analog asset management system.

As your business scales and you acquire more assets, you’ll find that you outgrow the capabilities of this method quickly. 

With pen and paper, you can’t rely on the same digital features that come with software or web-based systems. For instance, you won’t have the ability to run reports automatically. You won’t have real-time oversight of your inventory at multiple locations, a search function, or maintenance reminder notifications. You also won’t have a digital backup of your records.

Not to mention, the biggest drawback to analog record-keeping is the possibility of human error and time wasted with tedious, manual tracking.

Cost

In terms of pricing, you probably have everything you need already for this manual asset management solution. If not, paper and pens are pretty inexpensive and available just about everywhere. You don’t need to purchase expensive software or equipment for this method.

But how do you place a dollar amount on your time? Think of the opportunity cost when it comes to analog recordkeeping. Manual recordkeeping is time-consuming. The time spent on tedious pen and paper tracking could be better spent elsewhere in your business. Before you go the pen and paper route, consider if this is something you would be willing to stick with long-term or if you’ll need a more robust solution in the future. If you do make the switch to a different solution, you’ll have the time-consuming chore of manually entering your records all over again into the new system.

Spreadsheets

Spreadsheets are often seen as the next step up from manual pen and paper. With Excel or Google Spreadsheets, you’ll still need to enter your inventory data by hand, but the solution is a bit more customizable and flexible than an analog system. 

For instance, you can input formulas that allow you to sort your inventory or rank it by certain criteria like quantity, value, or date. Of course, you’ll need to accurately input the formulas, and you’ll be limited with what the formulas can do, but it’s still more functional than analog tracking.

Excel and Google Spreadsheets are also low-cost options. Chances are, you probably are already using one or both solutions for other aspects of your business today. The basics of the software are easy to master as most people are familiar with the software already. Typically, if you know how to use Excel, you can learn Sheets and vice versa. 

The biggest downside of using a spreadsheet to manage all of your assets is that they can get unruly to manage once you have multiple people who have editing privileges. It is easy to override changes by mistake. 

Plus, if you have thousands or tens of thousands of assets in one spreadsheet, it can be slow to load and update. 

Cost

If you already have Excel, then using it for asset management will cost nothing extra. If you don’t already have the software, you can get a Microsoft 365 plan that includes Excel and other Microsoft tools and starts as little as $5 per month. Google Sheets software is free for personal use, with business plans beginning at $6 per month. Free templates are also available with a quick Google search to help you get started.

Keep in mind that while the cost is low, properly using spreadsheets can be time-consuming and tedious. You need to be sure you have the time to devote to maintaining accurate records if you go this route.

The Workaround Solution

If you’re already using spreadsheets and want to add more functionality, then a workaround solution could be right for your business. This is also a good option for those that aren’t ready for the full capabilities of asset management software but need more than spreadsheets can offer alone. 

The most common workaround approach we see is people using Zapier in conjunction with a Google Sheet to manage their assets. 

Zapier offers different ways to handle repetitive tasks in your workflows, so you can use the solution for more than just inventory tracking. You can connect all of your work apps through the platform. It’s great for those using spreadsheets already that want to step up their workflow game, including asset management. 

While you can automate a lot of things with Zapier, there is a bit of a learning curve to get started. It is also a scrappy approach, so it is not uncommon for a zap to break out. And, the more zaps you have and the more tasks you run, the more expensive it gets. So, your workaround solution could end up costing you a lot more time (to fix bugs!) and money than paying upfront for asset management software, like Reftab.  

Cost

As mentioned above, Zapier plans can get costly the more you use them to automate stuff. While there is a free basic plan, it’s not enough for most teams. A starter plan begins at $19.99, but enterprise plans can cost as much as $898.50 per month. Of course, automating tedious tasks can save your team a lot of time. However, if you’re able to afford a larger Zapier plan, your funds might be better invested in a more robust IT asset management software solution.

Custom Solution

Of course, you always have the option of building your own asset management solution. This is best for large companies with a large budget, a dedicated team, and unique needs that can’t be addressed with off-the-shelf asset management software. 

Developing your own software gives you full flexibility and control of your software features. When you build your software, you can decide what features you need and how the software will integrate with your existing systems. The software can also be personalized to match your brand.

However, even if you have the funds, a custom-built solution isn’t always the right choice. There are several factors to keep in mind when deciding whether you should build or buy. 

Whether you have a software developer in-house or decide to outsource, the upfront cost of building the software won’t be your only expense. You’ll also need to update and maintain the software throughout its lifetime. 

Aside from the cost, you also need to consider the time it takes to build software. Developing new software takes time. Are you prepared to wait? What if there are delays? What if the lead developer leaves the company? How will you handle asset management in the meantime?

Cost

Building custom software is a significant investment. Because prices vary so greatly, you’ll need to scope out your needs and budget accordingly. Be prepared to pay more than a ready-made software solution, and know that you’ll likely have to pay for updates, maintenance, and support down the road. 

Keep in mind that building the software takes time, but it can be a worthwhile investment if you need a custom solution. Be sure to research existing software before making the jump to a custom solution. The features you need could be available through a cheaper, existing software option already.

Asset Management Software

This solution takes the painstaking, manual tracking out of asset management (including both physical and software assets). Asset management software, like Reftab, is an integrated platform that lets you track important asset data, including asset health and maintenance costs in real-time. This means you can easily scan, tag, and search for assets, prioritize maintenance and IT service tickets, perform routine audits, and quickly determine the lifetime cost of assets in one centralized location, among many other tasks. The software can also provide deeper insight and reporting that can’t be generated through spreadsheets alone.

Not to mention, asset management software is a robust solution that’s ready to go from the day you purchase it. It can also be used across mobile devices with many even having a dedicated mobile app. 

Cost

As mentioned above, asset management software is typically more cost-effective both in terms of time and money than any workaround or custom solutions. 

Many asset management software companies even offer freemium plans, including Reftab.  has the potential to be costly. Paid plans start at $30 per month for up to 500 assets. 

***

When deciding on an asset management solution, it’s important to think about your current as well as future needs. The solution you choose today should work with your future goals and have the potential to scale with your team. Otherwise, you could be looking at a messy transition to a different asset management solution in the future.
If you are interested in trying out Reftab, get started for free here.